NSURLSession 的基本用法

NSURLSession 在 2013年随着 iOS7 的发布一起面世的,苹果对它的定位是作为 NSURLConnection 的替代者,在 iOS9 之后苹果官方已经移除了 NSURLConnection,我们使用最广泛的第三方框架:AFNetworking、SDWebImage 的最新版也都已经全部使用了NSURLSession

与 NSURLConnection 相比,NSURLsession 最直接的改进就是可以配置每个 session 的缓存,协议,cookie,以及证书策略(credential policy),甚至跨程序共享这些信息,这将允许程序和网络基础框架之间相互独立,不会发生干扰,每个 NSURLSession 对象都由一个 NSURLSessionConfiguration 对象来进行初始化,后者指定了刚才提到的那些策略以及一些用来增强移动设备上性能的新选项

NSURLSession 中另一大块就是 session task。它负责处理数据的加载以及文件和数据在客户端与服务端之间的上传和下载。NSURLSessionTask 与 NSURLConnection 最大的相似之处在于它也负责数据的加载,最大的不同之处在于所有的 task 共享其创造者 NSURLSession 这一公共委托者(common delegate)

NSURLSession 指的也不仅是同名类 NSURLSession,还包括一系列相互关联的类,包括:NSURLSession、NSURLSessionConfiguration 以及 NSURLSessionTask 的 4 个子类:NSURLSessionDataTask,NSURLSessionUploadTask,NSURLSessionDownloadTask、NSURLSessionStreamTask(iOS 9 新增) ,还包括之前就存在的两个类;NSURLRequest 与 NSURLCache

接下来本文将讲解 NSURLSession 的使用

NSURLSession

NSURLSession 本身是不会进行请求的,而是通过创建 task 的形式进行网络请求(resume() 方法的调用),同一个 NSURLSession 可以创建多个 task,并且这些 task 之间的 cache 和 cookie 是共享的,NSURLSession 的使用有如下几步:

  • 创建一个 NSURLSession 对象
  • 使用 NSURLSession 对象创建一个 Task
  • 启动执行 Task

在开始使用 NSURLSession 之前,有必要了解一下 NSURLSession 以及它的组成部分

NSURLSession 的创建

有两种方式创建 NSURLSession 对象:默认 NSURLSession 对象 和自定义 NSURLSession 对象

1
2
3
4
5
6
7
8
9
10
11
12
13
//方式一
//获取默认的 Session 对象,会使用全局的Cache、Cookie和证书
let session = URLSession.shared
//方式二
//先创建 Session 配置对象
let config = URLSessionConfiguration.default
//自定义 Session 对象方式一
let session = URLSession(configuration: config)
//自定义 Session 对象方式二,指定代理对象
let session = URLSession(configuration: config, delegate: self as! URLSessionDelegate, delegateQueue: nil)

在使用自定义方式创建 NSURLSession 对象时,都需要传入一个NSURLSessionConfiguration 参数,NSURLSessionConfiguration 对以前 NSMutableURLRequest 所提供的网络请求层的设置选项进行了扩充,提供给我们相当大的灵活性和控制权。从指定可用网络,到 cookie,安全性,缓存策略,再到使用自定义协议,启动事件的设置,以及用于移动设备优化的几个新属性,你会发现使用 NSURLSessionConfiguration 可以找到几乎任何你想要进行配置的选项

NSURLSessionConfiguration

NSURLSession 在初始化时会把配置它的 NSURLSessionConfiguration 对象进行一次 copy,并保存到自己的 configuration 属性中,而且这个属性是只读的,因此之后再修改最初配置 session 的那个 configuration 对象对于 session 是没有影响的,也就是说,configuration 只在初始化时被读取一次,之后都是不会变化的

系统提供了创建一个 NSURLSessionConfiguration 实例对象的三种模式

  • default:标准的 configuration,这个配置共享 Cookie,缓存和证书
  • ephemeral:临时 configuration,与默认配置相比,这个配置不会将缓存、Cookie等存在本地,只会存在内存里,所以当程序退出时,所有的数据都会消失
  • background:后台 configuration 配置,该配置在后台完成上传和下载,在创建 Configuration 对象的时候需要提供一个identifier 用于标识完成工作的后台会话
1
2
3
4
5
6
// 创建 NSURLSessionConfiguration 的的三种方式
let config = URLSessionConfiguration.default
let config = URLSessionConfiguration.ephemeral
let config = URLSessionConfiguration.background(withIdentifier: "com.xiaovv.configuration")

创建了 NSURLSessionConfiguration 对象就可以给它设置各种属性

1
2
3
4
5
6
7
8
9
10
11
12
13
14
15
16
17
18
19
20
21
22
23
24
25
26
27
28
29
30
31
32
33
34
35
36
37
38
39
40
41
42
43
44
45
46
47
48
49
50
51
52
53
54
55
56
57
58
59
60
61
62
63
64
65
66
67
68
69
70
71
72
73
74
75
76
77
78
79
80
81
82
83
84
85
86
87
88
89
90
91
92
93
94
//缓存策略默认 NSURLRequest.CachePolicy.useProtocolCachePolicy.
open var requestCachePolicy: NSURLRequest.CachePolicy
//request 请求超时时间,默认60s
open var timeoutIntervalForRequest: TimeInterval
// 请求上传资源(上传、下载)的超时时间,默认7天
open var timeoutIntervalForResource: TimeInterval
/* 指定网络传输类型
public enum NetworkServiceType : UInt {
case `default` // 普通,默认类型 traffic
case voip //语言通信传输,voip 使用
case video // 视频传输
case background // 后台传输
case voice // 语音传输
@available(iOS 10.0, *)
case networkServiceTypeCallSignaling // Call Signaling
}
**/
open var networkServiceType: NSURLRequest.NetworkServiceType
//是否使用蜂窝数据,默认YES
open var allowsCellularAccess: Bool
//是否由系统根据性能自动裁量后台任务。默认值是NO。同sessionSendsLaunchEvent一样,只对后台configuration有效
open var isDiscretionary: Bool
//如果要为app的插件提供session,需要给这个值赋值
open var sharedContainerIdentifier: String?
//表示当后台传输结束时,是否启动app.这个属性只对 后台sessionConfiguration 生效,其他configuration类型会自动忽略该值。默认值是YES。
open var sessionSendsLaunchEvents: Bool
//指定会话连接中的代理服务器,默认 NULL
open var connectionProxyDictionary: [AnyHashable : Any]?
//接受的最小版本 TLS 协议,默认 SSL 3.0
open var tlsMinimumSupportedProtocol: SSLProtocol
//支持的最大版本 TLS 协议,默认 是当前系统最高支持的 TLS 版本,目前是 1.2
open var tlsMaximumSupportedProtocol: SSLProtocol
//目前暂时不使用,默认禁用
open var httpShouldUsePipelining: Bool
//默认为yes,是否提供来自shareCookieStorge的cookie,如果想要自己提供cookie,可以使用HTTPAdditionalHeaders来提供
open var httpShouldSetCookies: Bool
// Cookie 策略,决定了什么情况下 session 应该接受从服务器发出的 cookie,默认 onlyFromMainDocumentDomain
open var httpCookieAcceptPolicy: HTTPCookie.AcceptPolicy
/*
指定了一组默认的可以设置出站请求的数据头。这对于跨会话共享信息,如内容类型,语言,用户代理,身份认证,是很有用的。例如:
@{@"Accept": @"application/json",
@"Accept-Language": @"en",
@"Authorization": authString,
@"User-Agent": userAgentString
}
*/
open var httpAdditionalHeaders: [AnyHashable : Any]?
//同时连接到主机的最大数,macOS 默认6,iOS默认 4
open var httpMaximumConnectionsPerHost: Int
/* 存储cookie,清除存储,直接set为nil即可。
对于默认和后台的session,使用sharedHTTPCookieStorage。
对于短暂的session,cookie仅仅储存到内存,session失效时会自动清除。*/
open var httpCookieStorage: HTTPCookieStorage?
/*
证书存储,如果不使用,可set为nil.
默认和后台session,默认使用的sharedCredentialStorage.
短暂的session使用一个私有存储在内存中。session失效会自动清除。
*/
open var urlCredentialStorage: URLCredentialStorage?
/*
缓存NSURLRequest的response。
默认的configuration,默认值的是sharedURLCache。
后台的configuration,默认值是nil
短暂的configuration,默认一个私有的cache于内存,session失效,cache自动清除。
*/
open var urlCache: URLCache?
/*
Enable extended background idle mode for any tcp sockets created.Enabling this mode asks
the system to keep the socket open and delay reclaiming it when the process moves to
the background (see https://developer.apple.com/library/ios/technotes/tn2277/_index.html)
*/
open var shouldUseExtendedBackgroundIdleMode: Bool
//用来配置特定某个 session 所使用的自定义协议(该协议是 NSURLProtocol 的子类)的数组,对后台的configuration
open var protocolClasses: [Swift.AnyClass]?

URLSessionTask

NSURLsessionTask 是一个抽象类,其下有四个实体子类可以直接使用:NSURLSessionDataTask、NSURLSessionUploadTask、NSURLSessionDownloadTask、NSURLSessionStreamTask,这四个子类封装了现代程序四个最基本的网络任务:获取数据,比如JSON或者XML,上传文件和下载文件以及数据流的获取,这四个类有如下关系

NSURLSessionDataTask

NSURLSessionDataTask 是开发中使用频率最多的,我们平常使用的 GET 和 POST 请求都是通过它来实现的,NSURLSessionDataTask 可以通过 NSURL 或 NSURLRequest 创建(使用前者相当于是使用一个对于该 URL 进行标准 GET 请求),如果请求的数据简单并且不需要对获取的数据进行复杂操作,我们使用 Block 处理返回的数据

普通 GET 请求

1
2
3
4
5
6
7
8
9
10
11
12
13
14
15
16
17
18
19
20
21
22
23
24
25
26
27
28
29
// 通过 NSURL 创建
func getRequst() {
let session = URLSession.shared
let url = URL(string: "https://httpbin.org/get")
let task = session.dataTask(with: url!) { (data, response, error) in
if let result = try? JSONSerialization.jsonObject(with: data!, options: .allowFragments){
print(result)
}
}
// 使用 resume 任务开始运行
task.resume()
}
// 通过 NSURLRequest 创建
func getRequst() {
let session = URLSession.shared
let request = URLRequest(url: URL(string: "https://httpbin.org/get")!)
let task = session.dataTask(with: request) { (data, response, error) in
if let result = try? JSONSerialization.jsonObject(with: data!, options: .allowFragments){
print(result)
}
}
// 使用 resume 任务开始运行
task.resume()
}

普通 POST 请求

1
2
3
4
5
6
7
8
9
10
11
12
13
14
func postRequst() {
let session = URLSession.shared
var request = URLRequest(url: URL(string: "https://httpbin.org/post")!)
//设置请求方式,默认为GET
request.httpMethod = "POST"
let task = session.dataTask(with: request) { (data, response, error) in
if let result = try? JSONSerialization.jsonObject(with: data!, options: .allowFragments){
print(result)
}
}
task.resume()
}

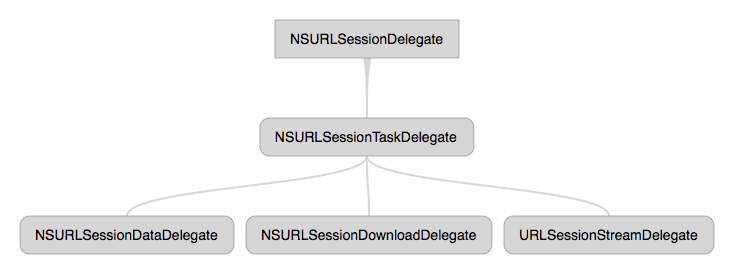
另外,我们也可以设置 session 的代理监听网络请求变化,具体的协议为NSURLSessionDelegate,它有四个直接或间接子协议分别是 NSURLSessionTaskDelegate、NSURLSessionDataDelegate、NSURLSessionDownloadDelegate 和
NSURLSessionStreamDelegate,它们关系如下:

1
2
3
4
5
6
7
8
9
10
11
12
13
14
15
16
17
18
19
20
21
22
23
24
25
26
27
28
29
30
31
32
33
34
35
36
37
func sessionWithDelegate() {
//delegateQueue 代理方法执行的线程
let session = URLSession(configuration: URLSessionConfiguration.default,
delegate: self as URLSessionDataDelegate,
delegateQueue: OperationQueue.main)
let request = URLRequest(url: URL(string: "https://httpbin.org/get")!)
let task = session.dataTask(with: request)
task.resume()
}
//MARK: - URLSessionDataDelegate
func urlSession(_ session: URLSession,
dataTask: URLSessionDataTask,
didReceive response: URLResponse,
completionHandler: @escaping (URLSession.ResponseDisposition) -> Void) {
print("接收到服务器的响应")
// 必须设置对响应进行允许处理才会执行后面的操作
completionHandler(.allow)
}
func urlSession(_ session: URLSession,
dataTask: URLSessionDataTask,
didReceive data: Data) {
//该方法可能被调用多次
print("接受到服务器的数据")
}
func urlSession(_ session: URLSession,
task: URLSessionTask,
didCompleteWithError error: Error?) {
print("请求完成之后调用成功或者失败")
}

NSURLSessionDownloadTask

NSURLSessionDownloadTask 主要用于下载,有两种方式:Block 和 代理,NSURLSession 在下载文件的时候,是将数据一点点地写入本地的一个临时文件,这个临时文件系统会很很快删除,所以我们需要把文件从这个临时地址移动到一个永久的地址保存起来,这样才算完整的下载完一个文件,另外,使用 NSURLSessionConfiguration 的 background 模式可以做到后台下载,并且即使应用被 Kill 之后也还可以恢复之前的下载任务

Block 方式下载文件

使用 Block 方式适合下载小文件,并且不需要监听下载进度,并且文件下载完成才会调用 Block

1
2
3
4
5
6
7
8
9
10
11
12
13
14
15
16
17
18
19
20
21
22
23
24
func downloadTask() {
let session = URLSession.shared
let request = URLRequest(url: URL(string: "https://cdn.sspai.com/2017/06/19/80b932adce51390f8c79070e8839cc95.jpeg")!)
let task = session.downloadTask(with: request) { (location, response, error) in
//location 是沙盒中 tmp 文件夹下的一个临时文件路径,tmp 中的文件随时可能被删除,所以我们需要自己需要把下载的文件挪到 Caches 或者 Documents 文件夹中
let locationPath = location!.path
let documnets = NSSearchPathForDirectoriesInDomains(.documentDirectory, .userDomainMask, true).last! + "/" + (response?.suggestedFilename)!
do {
try FileManager.default.moveItem(atPath: locationPath, toPath: documnets)
} catch let error as NSError {
print(error)
}
}
task.resume()
}
代理方式下载文件

使用代理方式适合下载大文件,并且可以随时监听文件的下载进度、暂停文件下载等

1
2
3
4
5
6
7
8
9
10
11
12
13
14
15
16
17
18
19
20
21
22
23
24
25
26
27
28
29
30
31
32
33
34
35
36
37
38
39
40
41
42
43
44
45
46
47
48
49
50
51
52
53
54
func downloadTask() {
let session = URLSession(configuration: URLSessionConfiguration.default, delegate: self as URLSessionDownloadDelegate, delegateQueue: OperationQueue.main)
let request = URLRequest(url: URL(string: "http://dldir1.qq.com/qqfile/QQforMac/QQ_V5.5.1.dmg")!)
let task = session.downloadTask(with: request)
task.resume()
}
//MARk: - URLSessionDownloadDelegate
func urlSession(_ session: URLSession,
downloadTask: URLSessionDownloadTask,
didWriteData bytesWritten: Int64,
totalBytesWritten: Int64,
totalBytesExpectedToWrite: Int64) {
//下载过程中写入数据会一直调用这个方法
//didWriteData:之前已经下载完的数据量
//bytesWritten:本次写入的数据量
//totalBytesWritten:目前总共写入的数据量
//totalBytesExpectedToWrite:文件总数据量
let progress = Float(totalBytesWritten)/Float(totalBytesExpectedToWrite)
print("totalBytesExpectedToWrite++++\(progress)")
}
func urlSession(_ session: URLSession,
downloadTask: URLSessionDownloadTask,
didResumeAtOffset fileOffset: Int64,
expectedTotalBytes: Int64) {
//暂停后恢复下载的代理方法
}
func urlSession(_ session: URLSession,
downloadTask: URLSessionDownloadTask,
didFinishDownloadingTo location: URL) {
//下载完成后的代理方法
let locationPath = location.path
let documnets = NSSearchPathForDirectoriesInDomains(.documentDirectory, .userDomainMask, true).last! + "/" + (downloadTask.response?.suggestedFilename)!
do {
try FileManager.default.moveItem(atPath: locationPath, toPath: documnets)
} catch let error as NSError {
print(error)
}
}
断点续传下载文件

使用 NSURLSession 下载任务支持断点续传,并且使用起来比 NSURLConnection 更加简单,下面看一下如何使用 NSURLSession 断点下载文件

1
2
3
4
5
6
7
8
9
10
11
12
13
14
15
16
17
18
19
20
21
22
23
24
25
26
27
28
29
30
31
32
33
34
35
36
37
38
39
40
41
42
43
44
45
46
47
48
49
50
51
52
53
54
55
56
57
58
59
60
61
62
63
64
65
66
67
68
69
70
71
72
73
74
75
76
77
78
79
80
81
82
83
84
85
86
87
88
89
90
91
92
93
94
95
96
97
98
var downloadTask: URLSessionDownloadTask?
var downloadSession: URLSession?
//记录暂停下载之后的恢复下载需要的信息
var resumeData: Data?
//开始/继续下载
@IBAction func startDownload(_ sender: UIButton) {
//开始下载
if resumeData == nil {
downloadSession = URLSession(configuration: URLSessionConfiguration.default, delegate: self as URLSessionDownloadDelegate, delegateQueue: OperationQueue.main)
let downloadRequest = URLRequest(url: URL(string: "http://dldir1.qq.com/qqfile/QQforMac/QQ_V5.5.1.dmg")!)
downloadTask = downloadSession?.downloadTask(with: downloadRequest)
} else {//暂停后,恢复下载
//利用 resumeData 重新生成一个任务
downloadTask = downloadSession?.downloadTask(withResumeData: resumeData!)
}
downloadTask?.resume()
}
//暂停下载
@IBAction func pauseDownload(_ sender: UIButton) {
weak var weakSelf = self
//任务暂停之后,会返回一个 resumeData,这个 resumeData 并不是下载任务的文件数据,
//而只是一个记录文件,用在恢复下载时候用来重新生成一个任务,resumeData 数据很小,可以持久化的保存
downloadTask?.cancel(byProducingResumeData: { (resumeData) in
weakSelf?.resumeData = resumeData
weakSelf?.downloadTask = nil
})
}
//取消下载
@IBAction func cancelDownload(_ sender: UIButton) {
if downloadTask != nil {
downloadTask?.cancel()
downloadTask = nil
}
}
//MARK: - URLSessionDownloadDelegate
func urlSession(_ session: URLSession,
downloadTask: URLSessionDownloadTask,
didWriteData bytesWritten: Int64,
totalBytesWritten: Int64,
totalBytesExpectedToWrite: Int64) {
//下载过程中写入数据会一直调用这个方法
//didWriteData:之前已经下载完的数据量
//bytesWritten:本次写入的数据量
//totalBytesWritten:目前总共写入的数据量
//totalBytesExpectedToWrite:文件总数据量
let progress = Float(totalBytesWritten)/Float(totalBytesExpectedToWrite)
self.progressView.progress = progress
}
func urlSession(_ session: URLSession,
downloadTask: URLSessionDownloadTask,
didResumeAtOffset fileOffset: Int64,
expectedTotalBytes: Int64) {
//暂停后恢复下载会来到这个代理方法
print("fileOffset++\(fileOffset)")
print("expectedTotalBytes++\(expectedTotalBytes)")
}
func urlSession(_ session: URLSession,
downloadTask: URLSessionDownloadTask,
didFinishDownloadingTo location: URL) {
//任务下载完成后的代理方法
let locationPath = location.path
let documnets = NSSearchPathForDirectoriesInDomains(.documentDirectory, .userDomainMask, true).last! + "/" + (downloadTask.response?.suggestedFilename)!
do {
try FileManager.default.moveItem(atPath: locationPath, toPath: documnets)
} catch let error as NSError {
print(error)
}
}

任务的暂停除了使用 cancel(byProducingResumeData completionHandler: 之外,还可以使用 suspend(),但是如果使用 suspend() 暂停任务,因为任务时可恢复的,那么对应的下载任务对象也是唯一的,也就是说 suspend()resume() 需要成对使用,都是同一个 NSURLSessionDownloadTask 调用

1
2
3
4
5
6
7
8
9
10
11
12
13
14
15
16
17
18
19
20
21
22
23
24
25
26
27
28
29
//开始/继续下载
@IBAction func startDownload(_ sender: UIButton) {
if resumeData == nil {
downloadSession = URLSession(configuration: URLSessionConfiguration.default, delegate: self as URLSessionDownloadDelegate, delegateQueue: OperationQueue.main)
let downloadRequest = URLRequest(url: URL(string: "http://dldir1.qq.com/qqfile/QQforMac/QQ_V5.5.1.dmg")!)
downloadTask = downloadSession?.downloadTask(with: downloadRequest)
} else {
downloadTask = downloadSession?.downloadTask(withResumeData: resumeData!)
}
downloadTask?.resume()
}
@IBAction func resumeDownload(_ sender: UIButton) {
downloadTask?.resume()
}
//暂停下载
@IBAction func pauseDownload(_ sender: UIButton) {
downloadTask?.suspend()
}

这里需要注意的是 suspend() 暂停任务过久会超时,超时时间取决于 NSURLRequest 设置的超时时间,系统默认是 60 秒

后台下载文件

之前我们提到 NSURLSession 使得网络构架和应用程序可以独立工作、互不干扰,这就可以做到添加到后台的 NSURLSessionTask 任务在外部进程运行,即使应用程序被挂起,崩溃,或者被杀死,它依然可以运行,也就是说通过 NSURLSession 可以实现真正的后台下载

创建后台下载的操作步骤:

  • 创建后台下载用的 NSURLSession 对象,configuration 设置 background 类型
  • 用这个 NSURLSession 对象生成 NSURLSessionDownloadTask,并开始下载
  • 在 AppDelegate 里实现 handleEventsForBackgroundURLSession 方法
  • 实现 NSURLSessionDownloadDelegate 中必要的代理方法

看具体代码实现

AppDelegate 部分代码

1
2
3
4
5
6
7
8
9
10
11
12
13
14
15
16
17
18
19
20
21
import UIKit
@UIApplicationMain
class AppDelegate: UIResponder, UIApplicationDelegate {
typealias SessionCompletionBlock = () -> Void
var completionHandler:SessionCompletionBlock?
var window: UIWindow?
func application(_ application: UIApplication, didFinishLaunchingWithOptions launchOptions: [UIApplicationLaunchOptionsKey: Any]?) -> Bool {
// Override point for customization after application launch.
return true
}
func application(_ application: UIApplication, handleEventsForBackgroundURLSession identifier: String, completionHandler: @escaping () -> Void) {
self.completionHandler = completionHandler
}

ViewController 代码

1
2
3
4
5
6
7
8
9
10
11
12
13
14
15
16
17
18
19
20
21
22
23
24
25
26
27
28
29
30
31
32
33
34
35
36
37
38
39
40
41
42
43
44
45
46
47
48
49
50
51
52
53
54
55
56
57
58
59
60
61
62
63
64
65
66
67
68
69
70
71
72
73
74
75
76
77
78
79
80
81
82
83
84
85
86
87
88
89
90
91
92
93
94
95
96
97
98
99
100
101
102
103
104
105
106
107
108
109
110
111
112
113
114
115
116
117
118
119
120
121
122
123
124
import UIKit
class ViewController: UIViewController, URLSessionDownloadDelegate {
@IBOutlet weak var progressView: UIProgressView!
var downloadTask: URLSessionDownloadTask?
var downloadSession: URLSession?
var resumeData: Data?
override func viewDidLoad() {
super.viewDidLoad()
progressView.progress = 0.0
progressView.isHidden = true
downloadSession = self.backgroundSession()
}
@IBAction func startDownload(_ sender: UIButton) {
if self.downloadTask != nil {
return
}
let request = URLRequest(url: URL(string: "http://dldir1.qq.com/qqfile/QQforMac/QQ_V5.5.1.dmg")!)
self.downloadTask = downloadSession?.downloadTask(with: request)
self.downloadTask?.resume()
progressView.isHidden = false
}
func backgroundSession() -> URLSession {
//后台下载任务必须设置为background,并且 Identifier 必须保证唯一
let configuration = URLSessionConfiguration.background(withIdentifier: "com.xiaovv.downloadSession")
let session = URLSession(configuration: configuration, delegate: self, delegateQueue: OperationQueue.main)
return session
}
//MARK: - URLSessionDownloadDelegate
func urlSession(_ session: URLSession, downloadTask: URLSessionDownloadTask, didWriteData bytesWritten: Int64, totalBytesWritten: Int64, totalBytesExpectedToWrite: Int64) {
if downloadTask == self.downloadTask {
let progress = Float(totalBytesWritten)/Float(totalBytesExpectedToWrite)
print("progress++++++\(progress)")
self.progressView.progress = progress
}
}
func urlSession(_ session: URLSession, downloadTask: URLSessionDownloadTask, didFinishDownloadingTo location: URL) {
print(#function)
let locationPath = location.path
let caches = NSSearchPathForDirectoriesInDomains(.cachesDirectory, .userDomainMask, true).last! + "/" + (downloadTask.response?.suggestedFilename)!
do {
try FileManager.default.moveItem(atPath: locationPath, toPath: caches)
} catch let error as NSError {
print(error)
}
}
func urlSession(_ session: URLSession, task: URLSessionTask, didCompleteWithError error: Error?) {
print(#function)
self.progressView.isHidden = false
self.progressView.progress = Float(task.countOfBytesReceived)/Float(task.countOfBytesExpectedToReceive)
self.downloadTask = nil
if error == nil {
print("Task: \(task) completed successfully")
} else {
//如果下载任务因为APP被杀死,重新启动也会来到这个方法,在这里继续下载
let err = error! as NSError
if let resumeData = err.userInfo[NSURLSessionDownloadTaskResumeData] {
self.downloadTask = downloadSession?.downloadTask(withResumeData: resumeData as! Data)
self.downloadTask?.resume()
}
}
}
func urlSessionDidFinishEvents(forBackgroundURLSession session: URLSession) {
print(#function)
let appDelegate = UIApplication.shared.delegate as! AppDelegate
if let completionHandler = appDelegate.completionHandler {
completionHandler()
}
print("All tasks are finished")
}
func urlSession(_ session: URLSession, downloadTask: URLSessionDownloadTask, didResumeAtOffset fileOffset: Int64, expectedTotalBytes: Int64) {
}
}

在下载过程中,如果按 App 被切换到后台,Session 的Delegate 不会再收到任务的消息,此时系统会接管任务继续下载,直到所有的任务都下载完成之后,系统会调用AppDelegate的application:handleEventsForBackgroundURLSession:completionHandler: 回调方法
,这个方法有一个block类型的参数 completionHandler,它的意义在于,一旦它被执行就表明后台任务处理完成,因此 App 被唤醒之后就会一直等待 completionHandler的执行,以便让App重新停止运行,因此,要记得把completionHandler传给 Session 的代理,并且在 Session 的代理方法 URLSessionDidFinishEventsForBackgroundURLSession: 中调用它,然后这样就实现了在最后一个任务处理完毕以后App再次进入后台

如果 App 被切换到后台,在任务没有完成之前就被系统杀死了,APP 重新启动后怎么继续恢复之前的下载呢?iOS 系统在APP 被杀掉前会保存应用下载的 Session 的信息,在应用重新启动之后,用之前相同的 identifier 来新建一个 NSURLSessionConfiguration对象,并且用这个 NSURLSessionConfiguration 对象新建一个 Session,这个 Session 就可以当成是原来的 Session 了,这样创建的 Session,正在运行的任务就会自动和它关联起来,一旦这个 Session 被创建并且设置了 Delegate,iOS 系统会立即对之前的下载任务来到 URLSession:task:didCompleteWithError: 这个代理方法,之后可以在这个代理方法里使用 resumeData 恢复下载任务了

后台传输注意事项:首先,后台传输只会通过Wi-Fi来进行,后台下载的时间与以前的关闭应用后X分钟的模式不一样,而是为了节省电力变为离散式的下载,并与其他后台任务并发(比如接收邮件等),后台任务只支持http和https协议,不支持自定义协议,如果后台传输的任务是在 App 已经进入了后台之后才初始化的,那么 Session 的 NSURLSessionConfiguration 对象的 discretionary 属性值设置为 true

NSURLSessionUploadTask

使用 NSURLSession 上传和 NSURLConnection 差不多,都是把需要上传的数据以表单的形式拼接在请求体中,NSURLSession 中使用NSURLSessionUploadTask 上传文件,创建NSURLSessionUploadTask 有以下两种方式

1
2
3
4
5
6
7
8
9
/* 创建上传任务,需要提供上传文件二进制数据 */
open func uploadTask(with request: URLRequest,
fromFile fileURL: URL,
completionHandler: @escaping (Data?, URLResponse?, Error?) -> Swift.Void) -> URLSessionUploadTask
/* 创建上传任务,需要提供上传文件所在的URL路径,不过这个方法常配合“PUT”请求使用 */
open func uploadTask(with request: URLRequest,
from bodyData: Data?,
completionHandler: @escaping (Data?, URLResponse?, Error?) -> Swift.Void) -> URLSessionUploadTask

表单拼接格式是固定的,必须严格按照规定的格式设置,具体格式如下

1
2
3
4
5
6
7
8
9
10
11
12
13
14
15
16
17
--上传标识符\r\n
Content-Disposition:form-data;name="表单控件名称";filename="上传文件名称"\r\n
Content-Type: 要上传文件MIME Type \r\n
\r\n
要上传文件二进制数据
\r\n
--上传标识符\r\n
Content-Disposition: form-data; name=\"参数名1\"\r\n
\r\n
参数值1
\r\n
--上传标识符\r\n
Content-Disposition: form-data; name=\"参数名2\"\r\n
\r\n
参数值2
\r\n
--结束标识符--\r\n

下面是的具体代码

1
2
3
4
5
6
7
8
9
10
11
12
13
14
15
16
17
18
19
20
21
22
23
24
25
26
27
28
29
30
31
32
33
34
35
36
37
38
39
40
41
42
43
44
45
46
47
48
49
50
51
52
53
54
55
56
57
58
59
60
61
62
63
64
65
66
//标识符可以随意,但是前后必须一致
var boundary = "byawhoydncphtfnk"
override func viewDidLoad() {
super.viewDidLoad()
}
override func touchesBegan(_ touches: Set<UITouch>, with event: UIEvent?) {
uploadFile()
}
func uploadFile() {
var request = URLRequest(url: URL(string: "http://localhost:8080/Server/upload")!)
request.httpMethod = "POST"
let contentType = "multipart/form-data; charset=utf-8;boundary=" + boundary
// 设置请求头(告诉服务器这次传给你的是文件数据,告诉服务器现在发送的是一个文件上传请求)
request.setValue(contentType, forHTTPHeaderField: "Content-Type")
let session = URLSession(configuration: URLSessionConfiguration.default, delegate: self, delegateQueue: OperationQueue.main)
let imageData = self.buildBodyData()
let uploadTask = session.uploadTask(with: request, from: imageData) { (data, respond, error) in
if let dic = try? JSONSerialization.jsonObject(with: data!, options: .mutableLeaves) {
print(dic)
}
}
uploadTask.resume()
}
func buildBodyData() -> Data {
var bodyStr = "--" + boundary + "\r\n"
bodyStr.append("Content-disposition: form-data; name=\"file\"; filename=\"test.png\"")
bodyStr.append("\r\n")
bodyStr.append("Content-Type: image/png")
bodyStr.append("\r\n\r\n")
var bodyData = bodyStr.data(using: String.Encoding.utf8)
let path = Bundle.main.path(forResource: "minion_03", ofType: "png")
if let imageData = try? Data(contentsOf: URL(fileURLWithPath: path!)) {
bodyData?.append(imageData)
}
let endStr = "\r\n--" + boundary + "--\r\n"
bodyData?.append(endStr.data(using: String.Encoding.utf8)!)
return bodyData!
}
//MArk: - Delagate
func urlSession(_ session: URLSession, task: URLSessionTask, didSendBodyData bytesSent: Int64, totalBytesSent: Int64, totalBytesExpectedToSend: Int64) {
let progress = Float(totalBytesSent) / Float(totalBytesExpectedToSend)
print(progress)
}

上面是上传图片的代码,实际开发中我们可能需要上传其他类型的文件,这个时候需要获取当前需要上传的文件的 MIME Type,并且上传文件的时候还有别的参数,上面的代码修改一下增加一个获取 MIME Type的方法,并且增加拼接普通参数到请求体中

1
2
3
4
5
6
7
8
9
10
11
12
13
14
15
16
17
18
19
20
21
22
23
24
25
26
27
28
29
30
31
32
33
34
35
36
37
38
39
40
41
42
43
44
45
46
47
48
49
50
51
52
53
54
55
56
57
58
59
60
61
62
63
64
65
66
67
68
69
70
71
72
73
74
75
76
77
78
79
80
81
82
83
84
85
86
87
88
89
90
91
92
93
94
95
96
97
98
99
100
101
102
103
104
105
106
107
108
109
110
111
112
113
114
115
116
117
118
119
120
121
122
123
124
125
126
127
128
//标识符可以随意,但是前后必须一致
let boundary = "byawhoydncphtfnk"
override func viewDidLoad() {
super.viewDidLoad()
}
override func touchesBegan(_ touches: Set<UITouch>, with event: UIEvent?) {
uploadFile()
}
func uploadFile() {
var request = URLRequest(url: URL(string: "http://localhost:8080/Server/upload")!)
request.httpMethod = "POST"
let contentType = "multipart/form-data; charset=utf-8;boundary=" + boundary
request.setValue(contentType, forHTTPHeaderField: "Content-Type")
let session = URLSession(configuration: URLSessionConfiguration.default, delegate: self, delegateQueue: OperationQueue.main)
let path = Bundle.main.path(forResource: "minion_03", ofType: "png")
let params = ["username": "xiaovv"] as NSDictionary
let fileData = self.buildBodyData(filePath: path!, fileName: nil, params: params)
//from bodyData
let uploadTask = session.uploadTask(with: request, from: fileData) { (data, respond, error) in
if let dic = try? JSONSerialization.jsonObject(with: data!, options: .mutableLeaves) {
print(dic)
}
}
uploadTask.resume()
}
//filePath:需要上传文件的路径 fileName:上传后文件名 params:普通参数
func buildBodyData(filePath: String, fileName: String?, params: NSDictionary) -> Data {
let localResponse = getLocalFileResponse(filePath: filePath)
let mimeType = localResponse.mimeType!
var newFileName: String
// 如果没有传入上传后文件的名称,采用本地文件名
if fileName == nil {
newFileName = String(describing: localResponse.suggestedFilename!)
}else {
newFileName = fileName!
}
//拼接文件参数
var flieBodyStr = "--" + boundary + "\r\n"
flieBodyStr.append("Content-disposition: form-data; name=\"file\"; filename=\"\(String(describing: newFileName))\"")
flieBodyStr.append("\r\n")
flieBodyStr.append("Content-Type: " + mimeType)
flieBodyStr.append("\r\n\r\n")
var bodyData = flieBodyStr.data(using: String.Encoding.utf8)
if let imageData = try? Data(contentsOf: URL(fileURLWithPath: filePath)) {
bodyData?.append(imageData)
}
bodyData?.append(flieBodyStr.data(using: String.Encoding.utf8)!)
bodyData?.append("\r\n".data(using: .utf8)!)
//拼接普通参数
var paramsBodyStr = ""
params.enumerateKeysAndObjects({ (key, value, stop) in
paramsBodyStr.append("--" + boundary + "\r\n")
paramsBodyStr.append("Content-disposition: form-data; name=\"\(key)\"")
paramsBodyStr.append("\r\n")
paramsBodyStr.append("\(value)")
paramsBodyStr.append("\r\n")
})
bodyData?.append(paramsBodyStr.data(using: String.Encoding.utf8)!)
let endStr = "--" + boundary + "--\r\n"
bodyData?.append(endStr.data(using: String.Encoding.utf8)!)
return bodyData!
}
// 本地文件请求,获取本地文件的mimeType和文件名
func getLocalFileResponse(filePath: String) -> URLResponse {
// 本地文件请求,获取本地文件的mimeType
let request = URLRequest(url: URL(fileURLWithPath: filePath))
var localResponse: URLResponse?
// 使用信号量实现NSURLSession同步请求
let semaphore = DispatchSemaphore(value: 0)
URLSession.shared.dataTask(with: request) { (data, response, error) in
localResponse = response
semaphore.signal()
}.resume()
semaphore.wait()//等待
return localResponse!
}
//MArk: - Delagate
func urlSession(_ session: URLSession, task: URLSessionTask, didSendBodyData bytesSent: Int64, totalBytesSent: Int64, totalBytesExpectedToSend: Int64) {
let progress = Float(totalBytesSent) / Float(totalBytesExpectedToSend)
print(progress)
}

URLSessionStreamTask

URLSessionStreamTask 提供了一个通过URLSession创建的TCP / IP连接的接口,这个类是iOS 9 之后提供的,本人没有使用过,网上关于NSURLSessionStreamTask 的资料很少,就不班门弄斧了,以后有机会再补充吧

总结

以上就是关于 NSURLSession 的基本用法,具体的使用根据需要自己去实现,在实际开发中,我们都会使用第三方网络库AFNetworking(OC)或者 Alamofire(Swift)进行网络请求,虽然很少使单独使用 NSURLSession,但是这些优秀的网络库都是以 NSURLSession 为基础的,所谓万变不离其宗,不仅要会使用第三方库,基础的东西也需要明白,有时间再总结一篇AFNetworking 的使用

参考

iOS使用NSURLSession进行下载

URL Session Programming Guide